

CHAPTER I
INTRODUCTION
A quadcopter, also called a quadrotor helicopter or quadrotor, is a multicolor helicopter that is lifted and propelled by four rotors. Quadcopters are classified as rotorcraft, as against fixed-wing aircraft, because their lift is generated by a group of rotors (vertically oriented propellers).
Quadcopters generally use two pairs of identical fixed pitched propellers; two clockwise (CW) and two counterclockwise (CCW). These use independent variations of the speed of every rotor to realize control. By changing the speed of every rotor it’s possible to specifically generate a desired total thrust; locate for the middle of thrust both laterally and longitudinally, and to create a desired total torque, or turning force.

Quadcopters differ from conventional helicopters, which use rotors that are ready to vary the pitch of their blades dynamically as they move around the rotor hub. In the early days of flight, quadcopters (then referred to either as ‘quad rotors’ or simply as ‘helicopters’) were seen as possible solutions to some of the persistent problems in vertical flight. Torque-induced control issues (as well as efficiency issues originating from the anti-torque rotor, which generates no useful lift) are often eliminated by counter-rotation, and therefore the relatively short blades are much easier to construct. Several manned designs appeared within the 1920s and 1930s. These vehicles were among the primary successful heavier-than-air vertical takeoff and landing (VTOL) vehicles. However, early prototypes suffered from poor performance, and later prototypes required an excessive amount of pilot workload, thanks to poor stability augmentation and limited control authority.
In the late 2000s, advances in electronics allowed the assembly of cheap lightweight flight controllers, accelerometers (IMU), global positioning systems, and cameras. This resulted in the quadcopter configuration becoming popular for small unmanned aerial vehicles. With their small size and maneuverability, these quadcopters can be flown indoors as well as outdoors.

Fig.2 Working of Quadcopter Drone
At a little size, quadcopters are cheaper and more durable than conventional helicopters thanks to their mechanical simplicity. Their smaller blades also are advantageous because they possess less K.E., reducing their ability to cause damage. For small-scale quadcopters, this makes the vehicles safer for close interaction. It is also possible to suit quadcopters with guards that enclose the rotors, further reducing the potential for damage. However, as size increases, fixed propeller quadcopters develop disadvantages relative to conventional helicopters. Increasing blade size increases their momentum. This means that changes in blade speed take longer, which negatively impacts control. Helicopters don’t experience this problem as increasing the dimensions of the rotor disk doesn’t significantly impact the power to regulate blade pitch.
CHAPTER 2
Literature Survey
Drones are becoming a major part of society. From hobby drones to military devices to delivery services, more and more drones are getting used today. In fact, between 2014 and 2015, drone sales increased 63% and have only continued to rise. But like all sorts of technology, drones aren’t flawless. And if you are a drone owner, it is vital to remember possible issues you’ll encounter. So let’s explore a couple of common drone problems and the way to repair them.
Decreased battery life: Having a functioning battery is one of the foremost important parts of flying a drone. This is why it is vital to properly charge the battery before trying to require flight. When the drone isn’t in use, it is best to store the battery during a cool, dry place — the battery shouldn’t be left within the drone when it’s not in use. This can help maintain the charge and increase the lifespan of the battery. Additionally, it is vital to not overcharge the battery, which may drastically decrease its lifespan. All in all, taking excellent care of the battery will ensure it lasts as long as possible.
Wrong direction during flight: If the drone’s compass isn’t calibrated properly, drone users may experience the flight direction being wrong or abnormal during flight. This can also occur if the drone is fitted with a mounted flight controller and therefore the specifications are simply misplaced. This is why it is vital to offer your drone a quick inspection before each flight. Calibrating the compass can usually help solve this issue but sometimes a restart of the remote control can help. If none of those solutions work, then drone repair services could also be needed to detect the basis of those drone problems.
CHAPTER 3
Scope of Quadcopter Drone
The standardization of controls and capabilities of drone-driven IoT will occur thanks to industry diffusion, regulation, and economics. This is an enormous opportunity for drone manufacturers who will naturally start to use similar apps, tools, and interfaces. The market for commercial/ civilian drones is expected to grow at a compound annual growth rate (CAGR) of 19% between 2015 and 2020. The following industries may benefit tremendously from this commercialization of drones:
- Agriculture – Aerial or orthographic surveillance of land to identify and control potential crop threats, such as pests or fungus infestations, will be possible. Soil irregularities, like water saturation and erosion, might be easily found. Moreover, aerial drones could scan fruit for sugar and temperature variables to seek out potential problems and also identify areas for selecting crops at optimal times.
 Fig.3 Scope of Quadcopter Drone in Agriculture
- Mining – Drone-driven IoT can be used to survey and audit various aspects of mining operations, including berm erosion, road analysis, subsidence, directing automated ground vehicles, and security.
- Construction – Drone-driven IoT can be used to survey build sites, monitor operations and progress, provide 3D mapping, inspect construction materials and check security.
- Utilities – Power lines, turbines, towers, and dams can be inspected by drone-driven IoT. Property surveys, equipment monitoring, and security functions also can be performed by drone-driven IoT.
- Delivery Services – Drone deliveries could begin as soon as regulations are set and services are available to expand operations.

Fig.4 Scope of Quadcopter Drone in Delivery service
- Film and tv – Drones are already getting used to mount cameras and take aerial shots which were previously possible only by the utilization of helicopters. Drones have provided a less noisy and vibration-free medium during this sector.
- Emergency Services – Drone drove is often used for traffic surveillance and accident assessment. they will even be wont to carry equipment, water, relief packages, and supply other logistical support functions.
CHAPTER 4
METHODOLOGY
1. Vertical Motion
Drones use rotors for propulsion and control. A rotor as a lover, because they work just about an equivalent. Spinning blades push air down. Of course, all forces are available pairs, which means that because the rotor pushes down on the air, the air pushes abreast of the rotor. this is often the essential idea behind lift, which comes right down to controlling the upward and downward force. The faster the rotors spin, the greater the lift, and vice-versa.
Now, a drone can do three things within the vertical plane: hover, climb or descend. To hover, the internet thrust of the four rotors pushing the drone up must be adequate to the gravity pulling it down. Easy. So what about moving up, which pilots call climbing? Just increase the thrust (speed) of the four rotors so that there’s a non-zero upward force that’s greater than the load. then, you’ll decrease the thrust a touch bit—but there are now three forces on the drone: weight, thrust, and air drag. So, you’ll still need for the thrusters to be greater than just a hover.
2. Turning (Rotating)
Let’s say you’ve got a hovering drone pointed north and you would like to rotate it to face east. How does one accomplish this by changing the facility to four rotors? Before answering, I will be able to draw a diagram of the rotors (viewed from above) labeled 1 through 4.
In this configuration, the red rotors are rotating counterclockwise and therefore the green ones are rotating clockwise. With the 2 sets of rotors rotating in opposite directions, the entire momentum is zero. momentum may be a lot like linear momentum, and you calculate it by multiplying the angular velocity by the instant of inertia. Wait. what’s the instant of inertia? it’s almost like the mass, except it deals with rotation. Yes, it gets rather complicated, but all you would like to understand is that the momentum depends on how briskly the rotors spin.
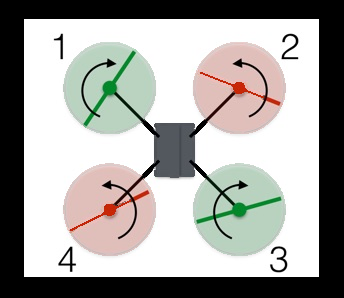
Fig. 5 Actual Motor working
If there’s no torque on the system (the system here being the drone), then the entire momentum must remain constant (zero during this case). Just to form things easier to know, I will be able to say the red counterclockwise rotors have a positive momentum and therefore the green clockwise rotors have negative momentum. I’ll assign each rotor a worth of +2, +2, -2, -2, which adds up to zero (I left off the units).
Let’s say you would like to rotate the drone to the proper. Suppose I decrease the angular velocity of rotor 1 such now it’s a momentum of -1 rather than -2. If nothing else happened, the entire momentum of the drone would now be +1. Of course, that can’t happen. therefore the drone rotates clockwise so that the body of the drone has a momentum of -1. Boom. Rotation.
But wait! Decreasing the spin of rotor 1 did indeed cause the drone to rotate, but it also decreased the thrust from rotor 1. Now internet upward force doesn’t equal gravity, and therefore the drone descends. Worse, the thrust forces aren’t balanced, therefore the drone tips downward within the direction of rotor 1. don’t be concerned. I can fix this.
To rotate the drone without creating all those other problems, decrease the spin of rotors 1 and three and increase the spin for rotors 2 and 4. The momentum of the rotors still doesn’t add up to zero, therefore the drone body must rotate. But the entire force remains adequate to the gravity and therefore the drone continues to hover. Since the lower thrust rotors are diagonally opposite from one another, the drone can still stay balanced.
3. Forwards and Sideways
What is the difference between moving forward or backward? None, because the drone is symmetrical. an equivalent holds for side-to-side motion. Basically, a quadcopter drone is sort of a car where every side is that the front. this suggests that explaining the way to move forward also explains the way to withdraw or to either side.
To fly forward, I want a forward component of thrust from the rotors. Here may be a view (with forces) of a drone moving at a continuing speed.
The Components which is employed for creating Quadcopter Drone:
- Frame: There are two possibilities when it involves a frame for your drone. you’ll make it yourself or pip out in a web store, and for a good choice of high-quality frames, we propose finding out our article about the best drone frames. If you opt to create it yourself, the project isn’t that difficult, but you’ll need some engineering knowledge and knowledge of the materials you’re getting to use. as example, you’ll use metal (something light), plastic, or maybe wood slats. If you decide on a wooden frame, you’ll need a wooden board that is about 2.5 cm thick.
- Motors: For a standard quad, you’ll need 4 motors in total, but an octocopter requires eight motors to fly. the advice is to use brushless motors – they’re lighter on the battery and, unless you’re an engineer who completely understands how a motor works, these pieces should be bought from a store. you’ll also get more conversant with them by reading our article about drone motors.
- ESCs or electronic speed control: These also are essential pieces of your drone as they’re responsible for delivering power to the motors. Again, their number depends on the number of arms your drone goes to possess.

Fig. 6 ECS or Circuit of Quadcopter Drone
- Propellers: When trying to find the propellers, you want to find those that match the frame of your drone. concentrate on materials – you won’t find wooden propellers, but you want to confirm those you select are an honest fit.

Fig. 7 Propellers of Drone
- Connectors: you’ll need 3.5 mm connectors to weld the motors and ESCs, also as 4.5 mm connectors for the facility distribution board.
- The power distribution board: This board connects the electronic speed controls to the battery.
- Batteries: When purchasing the batteries for your drone, you would like to think about the capacity of A battery and its type. the foremost used batteries for this purpose are Li-Po batteries and their power differs. to possess a way better insight on this subject, we strongly suggest finding out our article about drone batteries.
- Battery Monitor: This is often not an elementary item, but the monitor is sort of useful in warning you when the batteries are on the brink of finishing. In this manner, you don’t risk having the drone remain out of juice within the air, over a pond. A battery monitor ensures that your aerial vehicle won’t die within the most inopportune place.
- Mounting pad: It reduces the vibrations, and thus improves the flight. This one is extremely useful especially if you’re trying to require pictures or videos together with your DIY drone.
- Controller: This device shares the facility and commands the motors at an equivalent time.
- RC receiver: In fact, if you’ve got a transmitter (which is typical with you), you’ll even have a receiver mounted on the drone.
- Camera: If you would like to require aerial photos and record the environment while flying your drone, you’ll need a camera. the simplest cameras are people who can take the standard 4K videos, but everyone will find one consistent with their needs. For high-quality aerial photography and videography, you would possibly also need a gimbal for the camera.
- USB key: this is often necessary to save lots of photos and videos.
CHAPTER 5
Detail of Design, working, and processes
STEP-BY-STEP INSTRUCTIONS
There are different types of drones, but people find quadcopters to be more efficient, as they’re easy to fly.
So for this step-by-step guide, we’ve focused on showing you ways to create a quadcopter with pieces that you simply can purchase separately:
STEP 1: MAKING THE FRAME
No matter what your drone goes to be, it must have a frame. So, the primary task is to form a frame. For this purpose, you’ll use different materials, like metal, plastic, or wood. These materials will differ supported by how sturdy you plan the drone to be.
If you decide on wood for the frame, find a wood board that’s longer than 60 cm and about 25-30 mm thick. hack this board in such how to urge two laths which are 60cm long and 30mm wide. These two lengths are required to form the structure of your future quad.

Fig. 8 Frame of Quadcopter Drone
Crossing these two laths you’ll make the X frame. Also, you’ll need a wooden sheet to form and add an oblong piece within the central part of this frame. Its size should be 6×15 cm and about 2mm thick.
Of course, you’ll use other dimensions if you wish, but these will get you a reasonably nice quad. to attach these parts, you’ll need nails and glue. just in case you opt to travel with metal or plastic, the size is similar but the way you connect the laths goes to vary.
STEP 2: PROPELLERS, ELECTRONIC SPEED CONTROLLERS, AND MOTORS
The ESCs (Electronic Speed Controllers), the motors, and therefore the propellers are among the foremost important elements of a functional drone. So, you ought to get these components from a licensed store to make sure quality and reliability. they need to be following the dimensions of your drone, so bear this in mind when buying them. don’t be afraid to invite assistance from someone at the shop.
When trying to find the motors (or rotors), you ought to know that multi-rotor drones produce greater speed and ensure a stable flight, as each rotor works with the other’s thrust points. for instance, inspect these rotors:
- Emax RS2205 2600KV Brushless Motors
- Readytosky GT2205 2205 2300KV Brushless Motor
- HOBBYMATE 2204 Quad Copter Rotors Combo
- AOKFLY 4PCS RV1104 4200KV FPV Brushless Motor

Fig. 9 Motors and Propeller of Drone
For the propellers, we propose you purchase the metal 9-inch props you’ll find at a really affordable price on the market. These are durable and won’t bend so easily if the drone hits something during flight. However, if you would like better performance, it might be better to urge carbon props. If you would like a good performance we recommend you to urge any of these:
- BTG Quick Release Carbon Fiber Reinforced Propellers
- My shine 9450 Self-tightening Propeller Props
- Performance 1245 Black Propellers MR Series
- USA Carbon Fiber Propellers (2) Pair
- Heister Propellers 6 Pairs 4730F Colored Quick Release Folding Blades
And finally, you would like to select up some ESCs (Electronic Speed Controllers), if you don’t want 4 of those (keep in mind we’re talking a few quads here) you’ll buy the 4 in 1 controller. we might suggest these models, which are great and stable:
- AKK 30A 4 IN 1 2-6S Brushless ESC BLHeli_S Electronic Speed Controller DShot150/300/600 Capable for Micro Racing Drones
- Original Airboat Omnibus F4 Nano Flight Controller.
STEP 3: ASSEMBLE THE MOTORS
The next thing you would like to try to do is to drill the holes within the frame for the motors, consistent with the space between the screw holes on the motors. it might be good to form another hole that will allow the clip and shaft of the motor to maneuver freely.
However, you’ll skip this action if the motors already came with mountings. Put the motor within the appropriate place and fix it to the frame using the screws and a screwdriver.
STEP 4: MOUNT THE ELECTRONIC SPEED CONTROLLERS
After mounting the motors, you furthermore may need to mount the speed controllers. How will you be doing this? it’s recommended to attach the speed controllers on the rock bottom side of the frame thanks to several reasons which involve the functionality of the drone. These reasons, among others, include that it’ll “unload” the top of the drone where other components should be added.

Fig. 10 Electronic Speed Controller
To repair the ESC alright to the frame, you would like to use zip ties. This way, your ESCs are tied down and well secured while flying.
STEP 5: ADD THE undercarriage
This gear is a crucial part when landing your UAV because it significantly reduces the shock when the drone lands on land. They are often made in several ways, but you ought to be creative and make them in your own, unique way.
Here’s one idea: find a metal pipe (about 6 inches in diameter) and stop (with the acceptable tools) 4 rings which will be 1-2 cm thick. Of course, the dimensions of those rings should be by the overall size of your drone. you’ll then use adhesive tape to repair these pieces to the frame.
If you don’t like this metal pipe idea, you’ll also use other materials that are flexible but strong, like some new plastics, or anything which will reduce shock.
STEP 6: FLIGHT CONTROLLER
Every flying drone must have an impact system. This electronic system allows a drone to be stable within the air while flying and processes all the shifts and changes in direction and therefore the wind.

Fig. 11 Flight Controller of Drone
STEP 7: CHOOSING A RIGHT RC TX-RX (WIRELESS remote SYSTEM)
This is the remote system that’s needed to regulate a drone.
There are various available RC control systems nowadays, like Futaba, Spectrum, Turing, Fly Sky, and so on. you’ll find more details and research all of those systems here:
- Futaba 10JH 10-Channel Helix T-FHSS Computer Radio System
- Spectrum DX8 transmitter
- Turing 9X 9Ch Transmitter w/ Module
- Fly sky FS-i6X 10CH 2.4GHz AFHDS RC Transmitter w/ FS-iA6B Receiver

Fig. 12 Remote Controller of Drone
In addition to the present system, you’ll also need a couple of channels for yaw, pitch, throttle, and roll, also because of the additional channels if you would like to mount a camera control to your drone for a few aerial photographies.
STEP 8: MOUNT THE FLIGHT CONTROLLER
Once you select the actual flight controller that’s best for your needs, you would like to mount it. There are several ways to mount it. as an example, you’ll place it on the highest of the frame in a particular direction, but you would like to form sure that each one of the components is fixed well before calibrating your drone. For this purpose, you’ll also use the zip ties which were mentioned above.
It is recommended to place a little piece of put on the underside of the flight controller because it absorbs and reduces the vibrations from the motors. Thus, your drone is going to be more stable while flying, and stability is vital to fly a drone.
CHAPTER 6
Result and Application
According to the proposed plan, the outcome of this paper results in the event of a quadcopter that features a stable flight. This project is implemented using Raspberry-pi, a frame where everything is mounted, motors, and propellers for the movement of the quadcopter, ESC to regulate the motors. The result’s a really stable flight platform. the entire system helps in various applications like surveillance and rescue missions. Longer flight times are often achieved by adjusting the trade-off between two variables, the battery capacity (weight) the efficiency of the thrust developed by the motors. The efficiency of the thrust has two factors which are the efficiency of the motor itself and therefore the propeller design.
To safely fly the quadcopter; various tests were administered on the individual components and therefore the quadcopter as a whole to make sure everything is functioning properly before being flown. Two test stages were administered on the quadcopter; these tests were Unit tests and Flight tests.
Unit Tests While the essential control of the APM 2.6 was tested just by PID (proportional-integral-derivative) tuning and flying the quadcopter; there have been a variety of sensors that needed to be tested since they were used for the tracking algorithms. The barometer and compass onboard the flight controllers were unit tested to make sure optimal performance. These tests and are discussed below.
Battery test:
Battery test we had access to many different battery sizes from which they might perform battery life tests. The prototype; including the Flight time and camera accessories; had a mean current draw of 23.95A. With the most important 5100 mAh battery; the quadcopter was ready to meet the wants for flight time. Figure 4 shows the results including the assembly battery.
Motor test:
Motor test the motors were tested to lift the quadcopter and its components successfully (1.3kg). Above that; the motors were ready to lift a further 0.9 kg. The prototype was ready to fly over 15 km/hr. meeting the prototype requirement, but the utmost speed wasn’t tested out of concern for a crash that would occur during this test.
Pre-flight test:
The speed controller and motor were connected to the battery. Then the speed controller was switched on. The speed controller controlled the speed of the fan consistent with reassigned conditions on the IMU sensors. The speed of the fan increased because the surrounding atmospheric pressure increased and it decreased because the atmospheric pressure decreased. Increment of both atmospheric pressure and speed are often changed consistent with user preferences by the modification in programming. therefore the speed controller performed as per the planning.
Post-flight test:
The next test was actual flight time with loads starting from 0 grams to 480 grams. AA batteries were used because of the load; the batteries weigh 24 grams each and are easy to connect over the whole vehicle to distribute the load. The tests were conducted in both the tethered and untethered modes. The results of the constrained test are shown in Table 9. These results were verified by flying the quadcopter unconstrained with a weight of 96 grams and 480 grams to see performance differences at the 2 extremes and to work out the consequences of the quadcopter being constrained during testing. During the test, the quadcopter was flown at approximately five feet off the bottom and therefore the control panel was set to stabilize flight.
Some of the foremost common commercial applications and uses for UAV Drones are:
- Aerial Photography & Videography
- Real estate photography
- Mapping & Surveying
- Asset Inspection
- Payload carrying
- Agriculture
- Bird Control
- Crop spraying
- Crop monitoring
- Multispectral/thermal/NIR cameras
- Live streaming events
- Roof inspections
- Emergency Response
- Search and Rescue
- Marine Rescue
- Disaster zone mapping
- Disaster Relief
- Forensics
- Mining
- Firefighting
- Monitoring Poachers
- Insurance
- Aviation
- Meteorology
- Product Delivery
CHAPTER 7
Conclusions
This paper presents an approach that might be used for developing a little and compact-sized quadcopter that may be wont to perform rescue operations and supply audio/video aid to the people in distress. It could even be used as a closed-circuit television to extend the safety strength especially within the area where human interference is strictly prohibited. It could even be used for performing live video streaming. Quadcopters offer advantages for several applications when comparing with their manned counterparts. They save human pilots from flying in dangerous conditions which will be encountered not only in military applications but also in other scenarios involving operation in inclemency conditions, or almost buildings, trees, civil infrastructures, and other obstacles.
It may be mentioned that the platform which we’ve created is capable of sustaining autonomous flight at a height of 20 feet at a variety of 30 meters. While this in essence proves to need our ultimate goal; we’ve created a proven and solid platform for later development. Our platform is often outfitted with additional sensors (cameras; IR sensors; wireless technology; and 3D mapping tools; etc.) to expand the general usefulness and adaptability of the quadcopter design. The capabilities of this design may convince be asymptotic in nature; however, these might not be realized until proper funding is given and experimental analysis is conducted. The result suggests that we were ready to create a sustainable and versatile platform for an Unmanned Aerial Vehicle (UAV) capable of completing inspection in real-time on a pipeline facility.


Pingback: Top 5 Latest Technology in 2021-22 | New Trends Technology » Tejas Nikumbh